Virtual Networked NAS
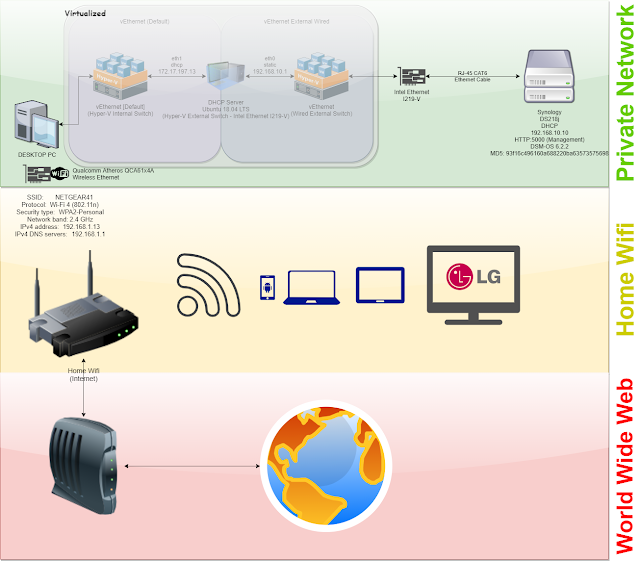 |
| Everything Configured from My Desktop PC running Windows 10; Color-Coded based on Trust, where Green is obviously the most trusted. |
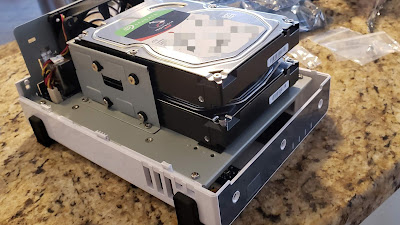
- Synology 2 bay NAS DiskStation DS218j (Diskless) - $175.84
- Seagate IronWolf 4TB NAS Internal Hard Drive (x2) - $210.58
Total: $386.42
Software Configuration:
- Install Hyper-V on Windows 10: https://docs.microsoft.com/en-us/virtualization/hyper-v-on-windows/quick-start/enable-hyper-v
- Download Ubuntu ISO: http://releases.ubuntu.com/18.04/ubuntu-18.04.3-desktop-amd64.iso
Create Virtual Switch for Desktop NIC:
- From Hyper-V Manager, Click "Virtual Switch Manager" on the Left-Hand "Action" Panel
- Select "External" for Create Virtual Switch Type
- Set Name as value that will be intuitive for your Desktop NIC. e.g. 'Wired External Switch"
- Choose the Ethernet Device Connected Directly to Synology NAS Device
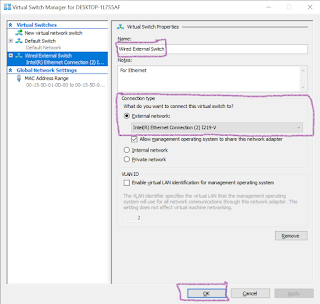 |
| Creating an External Switch in Hyper-V Think of this as a 'physical' switch between your CPU and Network Card, with only 1 port (Your NIC!) |
Create Virtual Machine and Install using ISO
Don't forget to add a second virtual NIC to the VM and attach it to the previously created external switch.
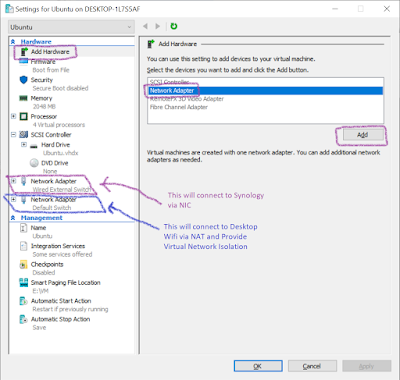 |
| Creating "Dual-Homed" VM w/ 2 Virtual NICs One for Synology, One for Internet(NAT) |
Static IP for "Wired External Switch"
You've now got everything connected. When you boot ubuntu you'll see 1 NIC has an IP (dhcp) from Hyper-V and provides Internet Connectivity. The second is not enabled at all. You'll need to enable this by editing /etc/network/interfaces as follows:
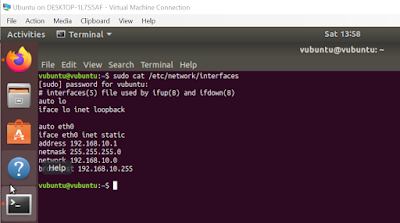 |
| Configure Ubuntu to have a Static-IP. This is normal for Servers that provide DHCP Ensure 'eth0' or 'eth1' corresponds with the External Switch chosen above. |
'sudo ifup eth0' will bring your NIC online after editing the interfaces file
DHCP Configuration (This part can be tricky)
Follow the instructions here: https://help.ubuntu.com/community/isc-dhcp-server
I've used the 192.168.10.0/32 network in this example to match up with the information provided in the link above. Make sure to check your syntax after editing the file. `ps -ef | grep dhcpd` should show the server is running. If there are errors, use `journalctl` to view any errors, fix them, and use `sudo systemctl restart isc-dhcp-server.service`. Once DHCP is running and everything is connected, you should see a Lease for the Synology using `cat /var/lib/dhcp/dhcpd.leases'.
Make sure to enable 'authoritative' DHCP, since this DHCP server is the only one on this External Switch.
Set up your Synology, Download the OS with VM
When the Synology gets an IP, it should get the first IP in your DHCP range. For me this was 192.168.10.10. Inside your VM, open a browser and go to http://192.168.10.10
You will be redirected to set up the device. Your device wont have an internet connection because we did not configure the VM to act as a gateway/router. So you'll need to click the link provided in the Synology setup, and Download the OS software to the VMs Downloads folder. Once complete, verify the checksum `md5sum ~/Downloads/DSM_DS218j_24922.pat`. This ensure you are getting the right software and no corruption occured during download. Then switch back to the Synology configuration Tab, and Choose "Select a File/Browse", navigate to the Downloads folder, and 'upload' the .PAT file to the Synology via the web interface. Finish the configuration and make sure to remember your NAS does NOT HAVE INTERNET CONNECTIVITY. This is so that you can ensure it is secure and not downloading software you do not explicitly provide.
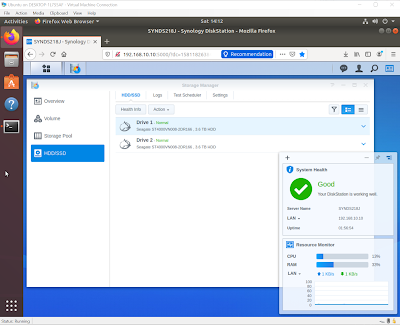 |
| Once configured using Defaults, you should have 2 drives providing redundant storage with 3.6TB of Storage |
What Next?
Now that everything is connected you'll want to think about how you want to access your synology from other devices. You could simply connect the Synology to your Wifi Router now and access it via wifi. However, this would expose it to the internet, so make sure you want to do that.
Another option would be to configure the Virtual Machine as a "Reverse-Proxy" for HTTP/HTTPS or set up the routing tables to forward specific ports and provide NATing back to the requester. There are several possibilities at this point and I hope you have found this tutorial useful and informative.
Read more on how I configure SMB w/ SCP between the Host OS, VM and Synology devices in the next post, https://championofcyrodiil.blogspot.com/2020/02/synology-follow-up.html
Read more on how I configure SMB w/ SCP between the Host OS, VM and Synology devices in the next post, https://championofcyrodiil.blogspot.com/2020/02/synology-follow-up.html


No comments:
Post a Comment