This is a short and sweet post. How to export all of your OID users.
(EXPORT IN LDIF Format)
ldapsearch -h $OID_HOSTNAME -p $OID_PORT -D cn=orcladmin -w $IAS_PASSWORD -L -b "cn=Users,dc=example,dc=oracle,dc=com" -s sub "objectclass=*" > export.txt
(EXPORT IN XML Format) - use this format if you want to remove the authpassword objects. OID does not allow the import of authpassword entries.
ldapsearch -h $OID_HOSTNAME -p $OID_PORT -X -D "cn=orcladmin" -w $IAS_PASSWORD -b "cn=users,dc=oracle,dc=example,dc=com" -s sub "objectclass=inetorgperson" > portal_users.xml

Monday, November 22, 2010
Saturday, November 13, 2010
Ace Combat: Assault Horizon
I have been looking for a good aerial combat video game. I have seen previews for this and thought it looked a lot better than anything else I have seen. I dont know how realistic the flight physics are, but i would assume they are quite realistic based on the obviously copious ammount of work that was done on the graphics art.
Pre-Order a copy:
http://www.gamestop.com/Catalog/ProductDetails.aspx?sku=270678&affid=9797
Pre-Order a copy:
http://www.gamestop.com/Catalog/ProductDetails.aspx?sku=270678&affid=9797
Wednesday, July 7, 2010
Solaris 10 Containers/Zones, Apache, PHP and OCI8
Creating a Solaris 10 Container, downloading the latest version of PHP and OCI8, configuring and compiling can be a long and annoying process if you are constantly running into errors. Lucky for you I already went through the process and have decided to upload the information here to help. I hope this helps someone out.
Before anything else you must create a container in solaris 10 to install apache, php and the oracle instant client. The main thing to remember here is that the solaris container must have a file system independent of the global zone. By default a few of the system folders are inherited when creating a solaris zone. I will show you how to create this zone without inherited folders so that you can install applications. Inherited zones are read-only and should only be used on containers that already have required software.
 The next step will be to log into your zone's console for initial configuration. This is best done from an additional putty terminal. just open a new instance of putty, and connect again to your global zone. Log into the console with the command:
Before anything else you must create a container in solaris 10 to install apache, php and the oracle instant client. The main thing to remember here is that the solaris container must have a file system independent of the global zone. By default a few of the system folders are inherited when creating a solaris zone. I will show you how to create this zone without inherited folders so that you can install applications. Inherited zones are read-only and should only be used on containers that already have required software.
As root, create a new solaris container, removing the default inherited packages. In this instance I have named the container (SSPGUI)
Sun Microsystems Inc. SunOS 5.10 Generic January 2005
# zonecfg -z SSPGUI
SSPGUI: No such zone configured
Use 'create' to begin configuring a new zone.
zonecfg:SSPGUI> create
zonecfg:SSPGUI> set zonepath=/zones/SSPGUI (filesystem you want zone files to reside)
zonecfg:SSPGUI> set autoboot=true
zonecfg:SSPGUI> remove inherit-pkg-dir dir=/usr
zonecfg:SSPGUI> remove inherit-pkg-dir dir=/lib
zonecfg:SSPGUI> remove inherit-pkg-dir dir=/sbin
zonecfg:SSPGUI> remove inherit-pkg-dir dir=/platform
zonecfg:SSPGUI> add net
zonecfg:SSPGUI:net> set address=10.35.56.95 (any available static IP)
zonecfg:SSPGUI:net> set physical=ce0 (physical adapter from global zone, ifconfig will tell you this)
zonecfg:SSPGUI:net> end
zonecfg:SSPGUI> verify
zonecfg:SSPGUI> commit
zonecfg:SSPGUI> exit
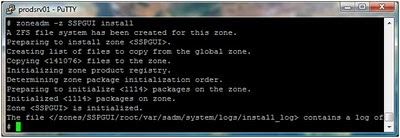
Once your zone is configured you will need to install it. The screen shot below should show my generated output from installing my zone. Do not worry if your package numbers/files are different. Though it should be larger than a zone with inherited folders.# zoneadm -z SSPGUI install
 The next step will be to log into your zone's console for initial configuration. This is best done from an additional putty terminal. just open a new instance of putty, and connect again to your global zone. Log into the console with the command:
# zlogin -C SSPGUI
# zoneadm -z SSPGUI boot

Once the zone has booted for the first time you will be asked to choose your console type. If using Putty choose option 13 (CDE Terminal), otherwise select the option which best matches your console type. After choosing your console type you should be see a screen which will go through some basic system settings. If you have any questions about any of these settings, contact your system/network administrator. If someone is not available to help, Leave all at default and set Name Service to None.
Once you have applied your initial configuration settings the zone will reboot. You will then be prompted to login. You may login with root and use the password that you set in the previous initial settings portion. At this point you should be logged into your container at root level and you can now close the previous putty screen used to create the container.
Enable FTP
Enable FTP with the svcadm command:
# svcadm enable ftp
If you will be connecting with user ‘root’, you must remove root from the denied users list. This list is located under /etc/ftpd/ftpusers. Quickly do this by typing ‘# vi /etc/ftpd/ftpusers’; arrow down to the root line, press the letter key D twice. Type a colon, then ‘wq’ (write and quit) and press enter.
First create a folder for the the php files we will be extracting. In this instruction we will create two folders: /inetpub & /inetpub/wwwroot.
# mkdir /inetpub
# mkdir /inetpub/wwwroot
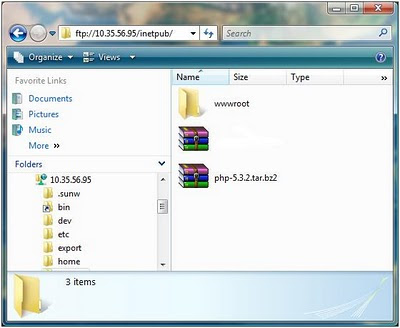
Now use FTP to copy your php source (PHP-5.3.2.tar.bz2) to you /inetpub folder.

From the /inetpub folder type the following commands:
# bunzip2 php-5.3.2.tar.bz2
# tar -xvf php-5.3.2.tar
# mv php-5.3.2 php-src
# rm php-5.3.2.tar
You should be left with only one new folder in /inetpub called php-src. This is the source which we will configure and make into executeable code for apache to use. By default Solaris 10 comes with Apache2 installed. If you do not have apache installed at this point, do so now.
Next you need to create a location to store the Oracle Instant Client. Make the following Directories:
# mkdir /oracle
# mkdir /oracle/product
Use FTP to copy the files basic-11.2.0.1.0-solaris-x86.zip and sdk-11.2.0.1.0-solaris-x86.zip to the /oracle/product folder. At this point change directories to /oracle/product (cd).
Ensure you are using the correct .zip files.
If the host machine has a SPARC processor, use solaris-sparc32.zip files.
If the host machine is a Intel-Based processor, use solaris-x86.zip files.
Unzip these folders with the following commands:
# unzip basic-11.2.0.1.0-solaris-x86.zip
# unzip sdk-11.2.0.1.0-solaris-x86.zip
Next you must create two symbolic links in the instantclient_11_2 folder that was just created. Change directory (cd) to /oracle/product/instantclient_11_2. Then execute the following commands:
# cd /oracle/product/instantclient_11_2
# ln -s ./libclntsh.so.11.1 libclntsh.so
# ln -s ./libocci.so.11.1 liblibocci.so
Configure Apache2 with FTP
Using FTP download the file /etc/apache2/httpd-std(standard).conf. change your RootDirectory to /inetpub/wwwroot. Also scroll through every setting and read the comments if your not sure what it does. This file is the configuration for Apache Web Server. Anytime you need to make changes to your web server, you will probably need to edit this file.
When you have made all your changes including adding:
LoadModule php5_module pathtomodules/libphp5.so
enable Apache2 with the following command:
# svcadm enable network/http:apache2
Configure & make PHP
Before you are able to configure and make the php code into usable executeable, you must add two folders to your environment PATH. These paths will point to Solaris 10 build tools, which should already be installed by default. Depending on what type of Shell you are using will depend on the command you need to issue in order to adjust your PATH variable. In this case we are using Bourne Shell and the command is as follows:
# PATH=$PATH:/usr/sfw/bin:/usr/ccs/bin/; export PATH
Next you will need to add the LD_LIBRARY_PATH for Oracle Instant Client.
# LD_LIBRARY_PATH=/oracle/product/instantclient_11_2; export LD_LIBRARY_PATH
From the /inetpub/php-src folder you will now configure the php source to be compiled with the following command:
# ./configure --with-apxs2=/usr/apache2/bin/apxs --with-oci8=instantclient,/oracle/product/instantclient_11_2'

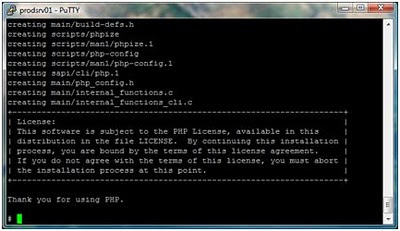
Once you see this screen. Type:
# make
This will can take a while. If you get errors during the make process, you can perform a cleanup using ‘make clean’ before starting the make process back up. Once The make operation completes (And you have no errors). Install PHP with the command:
# make install
Once make install is complete, obtain a test.php file from google and copy it to /inetpub/wwwroot.
Solaris 10 Service Administration attempts to start Apache2 within its own environment, thus you must specify a LD_LIBRARY_PATH within this environment. Failure to do so will result in the file libnzz1.so not being found when starting the apache2 service. To fix this, add the environmental variable with the following command.
# svccfg -s apache2 setenv LD_LIBRARY_PATH /oracle/product/instantclient_11_2
# svcadm disable apache2
#svcadm refresh apache2
# svcadm enable apache2
# /usr/apache2/bin/apachectl start
Finally open your web browser and go to your server’s IP address with the appended test.php:
Subscribe to:
Posts (Atom)